Friday, April 29

Not Enough Coffee In the World...

I'm convinced there is not enough coffee in the World to get me motivated today. Urgh.

It's been a few days since i've last posted, and it's been a busy few days! We had a lovely Easter (as I hope you all did, too!) and then Leighton started teething again. When she's teething- She. Gets. Sick. Runny nose, swollen eyes, a really horrible sounding barky cough (that makes her throw up), feverish. You name it, she gets it. So you can imagine how amazing she's sleeping at night (note: sarcasm), which means Mommy isn't getting any sleep either. I haven't slept in 5 days. Korah woke up yesterday with what seems to be an eye infection/cold starting, so it's just been a hoot.

Last night I went to the Roland Michener Seconday School's Annual Fashion Show! I believe they said it was the 47th Annual Show. It was such a good time! The kids really put on a good show. It's not the type of fashion show you all may be thinking. Yes, there is clothes to be modelled. The "models" (aka. grade 12 graduates) get all dolled up (hair & makeup) for the event. But, it's not just a simple walking up & down the runway kind of fashion show. There is a theme every year which is picked by the Fashion Show committee (last night was Viva Las Vegas!) There is a funny story line, and every set has fun music, ridiculous dancing, and hilarious "skits". It's such a blast! Once upon a time I use to be involved with the fashion show. In grade 11 I was on the sub-committee, on the actual committee in grade 12, and when I went back for my fifth year I was in the show again! It was such a good time - and a lot of hard work! Our committee did Lifestyles of the Rich & Famous, Hollywood baby! The funds for the show go towards Graduation.

But, enough babbling - lets get on to the tutorial I posted this morning :)

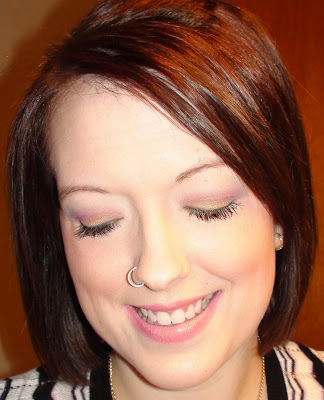
I did a gold and pink look, and really like the way it turned out! I hope you all do too!

Tutorial: http://www.youtube.com/watch?v=yxTpCqcc6qo


This look is sweet and simple! I hope you all enjoyed and we'll see you soon!

XO Doll

Sunday, April 24

Easter Inspired Look --*

. ( V )
.(='.'=)                             Happy Easter, everyone!
("").("")O

I hope everybody is enjoying their long weekend! The Easter Bunny came to our house last night, & the girls were pretty excited to see that this morning! :) Our baby girl is already 10 months old today! My, how time flies. :(
Yesterday, I created an Easter (/Spring) inspired look! I used nice, bright colours. It was a lot of fun creating the look!

Tutorial: http://www.youtube.com/watch?v=AY7AOBUzhXk


Bright colours are always so much fun! :) I created this look using BH Cosmetics 120 1st edition palette.

Until next time...

XO Doll

Friday, April 22

Neutral Eye, Red Lips & Retro Inspired Look

Hello ladies (& gents?)!

The other day I decided to do a very neutral smokey eye and POP it with a red lip. This look is great for any day and any occasion! Simple and subtle.

Tutorial: http://www.youtube.com/watch?v=f4hXkSt5evw


Today I did a very retro inspired look and I absolutely love the way it turned out! I used a pale teal colour on my lids and did hot pink lips! I guess having a head scarf on kind of inspired me to do this look (as well as a picture I found, he he). Did I mention my head scarf has little high heels on it? So cute! My best friend has a banquet (for her bowling league) next weekend, and i'm her date. I think this is the look i'm going to do, probably sporting a yellow dress! :) Maybe i'll even attempt faux lashes, haha. I hope you all enjoy it as much as I! It's very simple to do - and the photos don't pick up the colour quite as much as I would have liked ...

Tutorial: http://www.youtube.com/watch?v=IgPGjIeVOQM


^^^ Check out my nailpolish. Fuschia & turquoise! I love doing my ring finger (nails) a different colour then the rest! You can't see it, but I also did a chunky glitter on my ring finger(s) as well as my thumb(s)!

I hope you enjoyed these tutorials and i'll see you all again soon!

Happy Easter everybody!  ( V )
                                        (='.'=)
                                        ('").('")O

XO Doll

Tuesday, April 19

BH Cosmetics & ZenniOptical Haul Videos

Hello my lovely friends!

I uploaded the BH Cosmetics Haul Video I made, as well as the ZenniOptical Haul.

http://www.youtube.com/watch?v=ZRDeXFcpQZg  --> ZenniOptical

http://www.youtube.com/watch?v=L9hik22UgPo&feature=mfu_in_order&list=UL  --> BH Cosmetics

I did another tutorial today, so stay tuned for that in the next day or two! :)

XO Doll

P.S. Shortest blog post ever? Haha.

Monday, April 18

Tutorials, Tutorials!

I apologize for slacking in the blog department! I underestimated how much time and effort it took to film tutorials, edit, and get them uploaded! I have two new tutorials for you guys! I've decided that so long as I have a tutorial to go with a look, i'm not longer going to do a "Create This Look!" part in my blog posts (since you can see how I do it during my tutorial, hehe). I have to say, though, that I am really enjoying myself!

Now, I hadn't blogged about it all weekend, but on Friday I got my BH Cosmetics package delivered to my door!!! WAAAAAAAAAAAAAAAAAH! I was SO excited!
Side note: I also got my glasses in! YAY all around!
I am so in love with my new BH products! Love <3 The palettes are even better then I thought they would be, and the brush set is AH-MAZING. Both tutorials I have for you today are done with the 120 1st & 2nd Edition. I also have two haul videos on their way (BH Cosmetics & Zennioptical). I hope you all enjoy! :)

Smokey navy, grey, & pink

http://www.youtube.com/watch?v=snx6FV6QK3Q


Shout out -- This one's for you, Ky! :) If you want it a little less dramatic, use a lighter grey and don't bring the navy above the crease. You can also forgo lining your water line!


Yellow & Teal

http://www.youtube.com/watch?v=XPdLECZdeoE&feature=mfu_in_order&list=UL


Mah new glasses: Pair #1 (my FAVORITE pair ... leopard print, baby!)

I hope you all enjoyed. Stay tuned for my two haul videos! :D

XO Doll

Thursday, April 14

Prom Glittery Makeup & Tutorial!

FINALLY. I managed to get a video uploaded to YouTube. I decided to do a "prom look" since prom is quickly approaching!

http://www.youtube.com/watch?v=Q7jNEnwkn9k

I'm excited that it finally worked! Yaaaaaaay! I look so horrible on camera ... :-/ Man, I look tired. Ha.

Prom Glittery Makeup


Create This Look!:
I applied bonnebell eyeshadow stick in 14k gold all over my eye area and blended it in. Then, using an Annabelle translucent loose powder, I applied it all over my lids blending up from the crease (the colour is white/pink). Then, using a dark grey (83) from my 88 cool shimmer palette (BH Cosmetics) I "smoked out" my eye, following the natural V-shape of my lid and blending along the crease. I applied black eyeliner to my bottom lashline and went back over it with the same grey used before. I used beige (76) as my filler/highlight, and white (1) for the inner corners of my eyes. I lined my upper lashline with black liner and smudged it out. Now for the glitter! I took a paint brush and applied a little bit of Quo eyelash glue to the end of the brush. I then dipper it into my silver (NYX) glitter powder and dabbed it onto my lids (I put a kleenex under my eye to catch any fall out). I applied the desired amount to my lids and did a little bit along my lower lashline.


For the rest of my face, I just used a bronze colour on my cheeks. On my lips, I did a deep red. Haha, I know my application of that is a little rough - I'm waiting on my actual lip brush to come in - that should make it easier. ;)

Hopefully i'll now be able to upload more videos (even though they take 3 hours to upload, hmph) and do more tutorials!

XO Doll

First YouTube Video... Coming Soon!

Note: I started this blog post on Monday, hense the Happy Birthday singing to my daughter. I am only posting it today (Thursday) which is why it's LONG and has so many looks :) I've been working on tutorials but haven't been able to upload any to YouTube as of yet. I've been having difficulties. The video is too long, not the right format, yadda yadda. I promise I will figure it out SOON so that you will have tutorials to follow :)

------------------------------------------------------------------------------

Happy Birthday to you!
Happy Birthday dear Koraaaaaah.
Happy Birthday to you!

It's hard to believe our little girl is already 3 years old today! Wow. Time definitely flies. Her party was a success on Sunday afternoon. She loved her Ariel cake! :) I'm thinking about starting up another blog that will be devoted to.. well.. just life in general. My kids. Being a parent. That kind of thing. :) That way the Doll House can be strictly for makeup/fashion/shoe talk!

This look was inspired by a flower on Leighton's shirt (which is the same shirt I got my peacock look from).


Create This Look!:
I started by applying pink (13) to the inner corner of my lids. I then applied green (44) to the rest of my lids, blending in with the pink. I also carried the green to my bottom lashline. I then took orange (14) and applied that colour to the crease. Once the orange was applied, I then took the green and brought it out to line under the orange. I lined the upper and lower lashlines with black. I used white (1) for my filler/highlight. On my cheeks I used the bubble gum pink from my Quo blush palette. I just did a clear gloss on my lips.


For this look I decided to do a gold and red/copper look. It's very rich, would be great for going out, especially around the Holiday's (haha!)


Create This Look!:
I took a gold shadow from an Annabelle duo that I have, and applied it the the center of my lids. I then took a black shadow (that had gold flecks in it - part of the Annabelle duo) and applied that to the inner and outer corner of my lids. I took this same black and lined under my eye. I then took a red/copper colour (87) and applied it over top of where I applied the black shadow on my lid, blending up. I then added a bit more gold to match the height of the red and slightly blended everything together in the crease. I used white (1) for my highlight. I lined my upper and lower lashlines, as well as my water line, and added black shadow on my water line as well.


Yellow & Pink!
This was a really fun look. Nice and bright! I used a bubble gum pink blush (Quo) and candy pink gloss on my lips. Fun, candy kissed look :)


Create This Look!:

I started by applying yellow (7) on my entire lid. I carried the yellow to my lower lashline as well. I then took pink (13) and applied the colour to the outer corners of my eyes in no particular shape, just dabbed it on and slightly blended with the yellow. For my highlight I used white (1). I lined my upper and lower lashlines with black.


Lemon, Lime, Forest
On my cheeks I used a rose coloured blush and on my lips I did a clear gloss. I love working with yellow and green!


Create This Look!:
Start by applying yellow (7) to the inner corners of your eyes, carrying the colour down to the inner corner of your lower lashline. Then, apply a bright green (44) to the middle of your eye, slightly blending with the yellow. Taking a dark forest green (48) apply to the outer corner of your lids, and applying in a circular motion blend with the bright green and along the crease. Carry this same green to your lower lashline. Line your water liner, upper and lower lashlines with a dark green liner (going over the water line with the forest green shadow). For highlight mix white (1) and pale yellow (2). I also brought the highlight colour to the inner corners of my eyes to brighten them up a little.


Smokey Gold & Purple.
For blush I mixed a pink & merlot colour. I did a clear gloss on my lips. This is a great look for a night out, whether it be to dinner or out dancing. Smokey eyes are always a winner.

Create This Look!:
I used gold (from my Annabelle duo) and applied it all over my lid. I then took a purple/wine colour (2) and applied it all over my lid, blending up. I carried this colour to my lower lashline. I used black (Annabelle duo) and following the natural V-shape of my lids, blended in in a circular motion - slightly blending along the crease. This creates a "smokey" effect. I carried the black to the outer 1/3 of my lower lashline. I lined my waterline, upper and lower lashlines with black liner and went back over my water line with black shadow.


Sorry it's so long. I hope you enjoyed these looks! Stay tuned for tutorials :) Hopefully I can get things figured out! Haha.

XO Doll

Friday, April 8

Plum & Gold!

I've done this colour combination plenty of times, but never took pictures of it. The first time I ever did it, I got the inspiration from our comforter! (look below) :P


The Look!
Hmph, it looks a lot more gold in person. Ah well. :)

Create This Look!:
I started by applying gold (80) all over my lids. I applied this same gold to the inner corner and inner 1/3 of my lower lashline. I then took plum (36) and following the natural V-shape of the outer corner of my lids, I applied it in a circular motion. I blended the plum up slightly, as well as along the crease. I carried this colour to the remaining 2/3 of my (outer) lower lashline. The plum wasn't as deep as I wanted it to be, so I ended up layering on a wine colour from my L.A. Colors palette (5) over top of where I had already did the original plum. I then mixed a silverish colour that had a hint of gold and white (1 & 73) for my highlight/filler. I used this same mixture and applied it to the inner corners of my eyes. I used black liner for my water line, upper and lower lashlines. I went over the water line with plum. For mascara I used Double Extend and the Falsies, using the gold shimmer top coat for a little ooh-la-la. :P For blush I mixed merlot (2) with a bronzer (5). I finished off the look with a red tinted gloss.

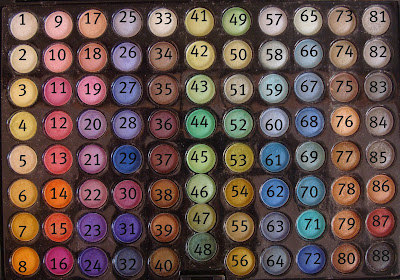
BH Cosmetics 88 cool shimmer palette
L.A. Colors Darling Palette
Quo blush palette
I tried out wearing a scarf on my head .....
..... I have to say, I actually kind of like the look! It's definitely different (for me) but something I may try wearing out and about one of these days! :) What do you all think?

Happy Friday!

XO Doll

Thursday, April 7

Playing Dress Up

After almost two years of hanging in the closet, I put my wedding gown on today. I have to say that I love it just as much now as I did when I wore it to walk down the aisle <3 I still feel like a princess in it! :) I've decided to sell my dress. It's just sitting there, collecting dust (figuratively). I want someone else to have the chance to wear it, and feel the way I did on our wedding day - absolutely beautiful. :)


No biggie!... Just what I do for fun ;)


Mommy & her assistant :P ------->

"Mommy, your dress is beautiful! You're perfect, Mommy. Perfect!"

One day my little girl will be dressed like a Princess like this too <3


There's something about weddings that gets me all emotional (as if I wasn't already emotional to begin with, haha!) Knowing that two people feel the way Curtis and I felt on our wedding day makes me really happy! :) If I could, I would be a wedding planner OR open up a bridal boutique. Being surrounded by everything wedding would make me one ridiculously happy Mama! Just ask my friends :P Haha.

Our wedding day was perfect. I wish I could go back and do it again. It will be two years in June <3 I hate to boast, but I really do have an amazing husband! :)

^^^ Those are probably my four favorite pictures from our wedding day. I have all four of them framed, hanging on our walls in the living room. :)

Ok, i'm done. And so are the banana-chocolate chip muffins i'm baking. Yummo!


XO Doll

Green With Envy.....

.....just kidding! Definitely not green with envy, but green nonetheless! Since Easter is coming I decided to use a pastel-ish green for this look. Pretty simple! :)


Create This Look!:
I took green (49) and applied it all over my lid, also carrying it to my lower lashline. I blended up slightly to erase any harsh lines. I then took a dark gray (85) and in the natural V-shape of the outer corner of my eyes, applied it in a circular motion, slightly blending into the crease as well as down under the outer part of my lower lashline. I used a soft green (33 - it looks almost white) for my highlight and also applied that colour to the inner corners of my eyes. I used a gray liner for my top and bottom lashlines, as well as my water line - going back over the waterline with the dark gray shadow. I used CG and MF mascara. On my cheeks I used Jordana blush in sunlit bronze and a neutral gloss on my lips.


So, guess whaaaaaat!? I finally ordered the Spring bundle deal from BH Cosmetics that i've been wanting for weeks! My husband gave me the a-ok to order it. He was tired of hearing me talk about it! Haha. With the bundle I am getting the 120-palette 1st edition, 120-palette 2nd edition, 10-piece makeup brush set, 10-colour camouflage and concealer palette, contour and blush palette, and a 66 lip colour palette. I AM STOKED!!! I can't wait to start experimenting with new colours, matte colours, more colours! I also ordered myself some new glasses today. For those of you who wear glasses, you must check out Zennioptical.com! Thousands of glasses for ridiculously cheap! I ordered myself 3 pairs, as well as a pair for Curtis, and with shipping my order only came to $52! Amazing. Curtis already has a pair of glasses from the site (along with Michelle and her boyfriend, Dan) so the site is legit and the quality is pretty good. Go check it out! :D

We're having Korah's birthday party on Sunday. I can't believe she's already 3 on Monday! :( Time needs to slow down a little. She keeps requesting an Ariel birthday cake, so that's what i'm going to attempt! We're decorating 'Princess' theme. I'm so excited to get their playhouse made this summer (Curtis and I, my parents, and Curtis' Dad are pitching in and my Dad is building the girls a playhouse as a joint gift). I wonder who will like it more? The girls or Mommy! Haha.

XO Doll

Tuesday, April 5

Pastel Eyes, Bright Lips, & Snow?

The weather was getting nicer. The past two days we've been getting snow again! >:( I know, I know. We live in Northern Ontario, what do you expect? I was just loving the sun. Loving the warm weather. Common Spring, we want youuuuuuu!


This is what we woke up to (or what I was awake during the early hours of the morning). The roads and yards were finally becoming bare ... and now this is what they look like, AGAIN! :( Haha.


Today I decided to do a very soft look on my eyes (pastels) with an IN YOUR FACE lip colour! :) Pairing colour on your eyes with colour on your lips works with the right colours. :)


Create This Look!:
Start by applying yellow (4) to the inner half of your eye lids. Carry this yellow to the inner 1/3 of your lower lashline. On the outer half of your eyelids, apply pink (10). I mixed two browns from my L.A. Colors palette (4 & 5) and applied that to the outer V-shape of my eyes, blending along the crease and up slightly. I carried these same brown colours to my lower lashline, applying it to the outer 2/3. I then used the white (1) from the L.A. Colors palette for my highlight. I lined my upper and lower lashlines with a dark brown eyeliner, also lining my water line. I then took the darkest brown (5) and applied that to my water line. I used CGLBF and MF mascara. For blush I used the first merlot colour in my palette (2) which has a slight shimmer to it. On my lips I used L'Oreal Paris Color Riche in Intense Fuchsia!

BH Cosmetics 88 Cool Shimmer Palette
L.A. Colors Darling Palette
Quo Blush Palette
This is a cute look for Easter/Spring! :)

XO Doll